
Restoring your Car's Interior Can Be a DIY Job
Whether your leather upholstery is a fading, creasing, cracking, or showing signs of wear, the state of your leather upholstery can change the look of the interior, even if the rest of the interior is in great condition.
So before you get ugly seat covers, or book your appointment to reupholster your seats. You can simply restore the leather of your interior. Leather, with good products, and proper care for will last you a lifetime. Restoring your leather seats is very expensive. However, if you are willing to use a couple hours of your time, you can restore leather yourself.
Items You'll Need for Leather Repair
|
|
What to look for in a Leather Repair kit..
Look for a leather repair kit that contains a cleaner, conditioner, and color restorer. Whichever product you decide to you, contact the distributor regarding color matching of your leather. If you are restoring the original color, contact the vehicle manufacture for a color code, or send in a swatch of your leather (under the seat you will find a spare piece to sample) to the supplier of color matching solution. Also note, that there are many leather restore products on the market offer quick fixes.
Beware of these so called quick fixes for they contain only petroleum distillates which result only in weakening the leather fibers, and stitching. For example, the silicone will harden into the leather limiting its flexibility, and the waxes will make your leather shine, only to trap dirt, and contaminate the hide. Therefore, it is crucial to understand the importance, and significance of buying quality products that actually rejuvenate your leather. Your product should contain a leather specific collagen complex, which will actually penetrate the hide, and nourish, restore, and keep the leather supple, and flexible.
I’d recommend using Glipstone Liquid Scuff Master, Lexol Leather Care, and Leather World which are all highly recommended leather repair brands. Additionally, Guardsman makes a pretty good leather care product and they have a full care guide your can download here.
Repairing
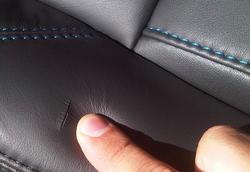
The first step in vehicle upholstery repair is evaluating the extent of the damage. If there are holes or tears in the upholstery, you might not be able to repair it. You can look into a leather patch repair kit, but if you want a flawless repair, see a professional. Also, if the leather damage extends to the seat belt, or other safety equipment, you will want to seek a professional to tackle the repairs. Do not try to tackle any repairs that involve the safety equipment of the vehicle.
Step 1: Clean your interior
The best way to deep clean your interior of your vehicle is to remove everything from the vehicle, including the seats, if accessible. You will want to thoroughly clean every nook and cranky of the interior. That includes thoroughly vacuuming the seats, and floorboards, and examining the surfaces for stains or blemishes. Use a leather cleaner product, and a damp cloth or sponge and rub in circular motion to remove initial dirt. For the grimy spots, use the leather cleaner and the soft-bristle brush. Once satisfied, remove the any cleaner residue and gently wipe the area with a mild solvent like isopropyl alcohol. Once the leather is again completely dry, examine the surfaces for worn or faded spots.
If your leather is cracked:
Make sure the leather has been cleaned, like the above instructions. When the leather is dry, gently sand the cracked areas with a 600 grit sandpaper, until smooth. Careful not to remove too much old leather with the sandpaper, that you create a suede.
Next open a leather repair kit, one that has a leather sealant product, or leather crack filler. Use the product to smooth out the cracks according the packaging. Once the leather is dry, you can continue on to sand, or layer if necessary. Once you have maintained a flawless finish, move on to the next step.
Step 2: Dye or Restore Faded Surfaces
If your leather seats are faded, you can also restore or change the color. Before you begin, test a small spot to make sure your color matches your swatch, and are happy with the color.Keep in mind, it is normal for the color to be slightly more vibrant until it dries. When you are ready to begin, consult your packaging instructions, and start with the seams, pipping, and edges, and allow them to dry. Then proceed to the broader areas. Apply several thin coats, making sure to brush in all directions. Careful, not to stop in the center or middle of a panel. In order to get a professional looking job, work slow, and consistently. Allow each piece to dry thoroughly before you continue to apply another coat. If you are changing the color, expect to have to do additional coats. Depending on the instruction of the product that you used, 24- 48 hours later when the leather is dry completely, use a leather conditioner to bring a rich shine to the leather.
Restore your Steering wheel:
If you also want to dye or restore the leather of your steering wheel, the steps will be the same. However, usually steering wheels have a protective clear coat protection on them. It is important to replace this finish after, with an application of leather clear coat.
Restore your Steering wheel:
If you also want to dye or restore the leather of your steering wheel, the steps will be the same. However, usually steering wheels have a protective clear coat protection on them. It is important to replace this finish after, with an application of leather clear coat.
Step 3: Apply Leather Conditioner
Once you are satisfied with your leather, and it is fully dry, your leather ready to be conditioned. Most leather-care products come with a toner to alter the color, so test a small area for a color match, and alter the solution as needed. Apply to product per the manufacturer’s instructions, usually with a soft-bristle brush or sponge. If your leather has creases or cracks, dilute the product by 30% with water, and rub it into leather. Letting it dry for a minute or so, and rubbing the solution off with a damp cloth. The product will come off the leather but should remain in the creases, and cracks.
Now that your leather upholstery is in great condition again, how do you keep it that way?
Condition seats regularly
Maintain a clean vehicle interior, by vacuuming debris regularly, cleaning all upholstery with gentle cleaner. Be sure to use the right products, for the right upholstery. After cleaning, finish the job by applying a leather conditioner to your leather upholstery. The conditioner will help the leather upholstery with their pliability, and will prevent cracks, and signs of wear.
Avoid the sun
Leather upholstery will fade, or crack with continuous extended periods of direct sunlight. Use a sunshield in the windshield if you have to. If your side windows aren’t tinted, you can use window panels to minimize the sun’s intensity, and to shield potential damage.
Avoid bulky and sharp objects
Always put bulky objects in your trunk if possible. When putting objects on the seat, make sure to lay down something over the leather for protection, like a blanket or pad. Sharp or bulky objects is the easiest way to rip or tear your upholstery. So don’t keep tools, pet carries, or sharp objects directly on the seat.
 RSS Feed