BOB's CUSTOM PAINT, Inc. - (623) 937-5724
Bob's Custom Paint & Restoration
  • Home
  • The Shop
    • Gallery of Cars
    • Car Stories
  • Restoration
  • Upholstery
  • Contact

How to Maintain your Car's Leather Interior

11/29/2017

2 Comments


4 Tips to Keep your Vintage Automobile's Upholstery Looking Timeless

​When it comes to your leather upholstery for your classic car, proper maintenance is the secret to keeping your upholstery looking good as new. Maintenance can be a hassle, if you aren’t prepared for the task. There are many techniques, and cleaning products, so take the time to research what is best for your specific leather upholstery. This will guarantee, that you won’t risk accidently damaging your upholstery.
interior classic car shot
​The reason why cleaning your interior is worth all the hassle, is because regular light cleaning will help maintain your seats and increase their lifespan.

​Here are a few tips, on how to keep your interior showroom ready. 

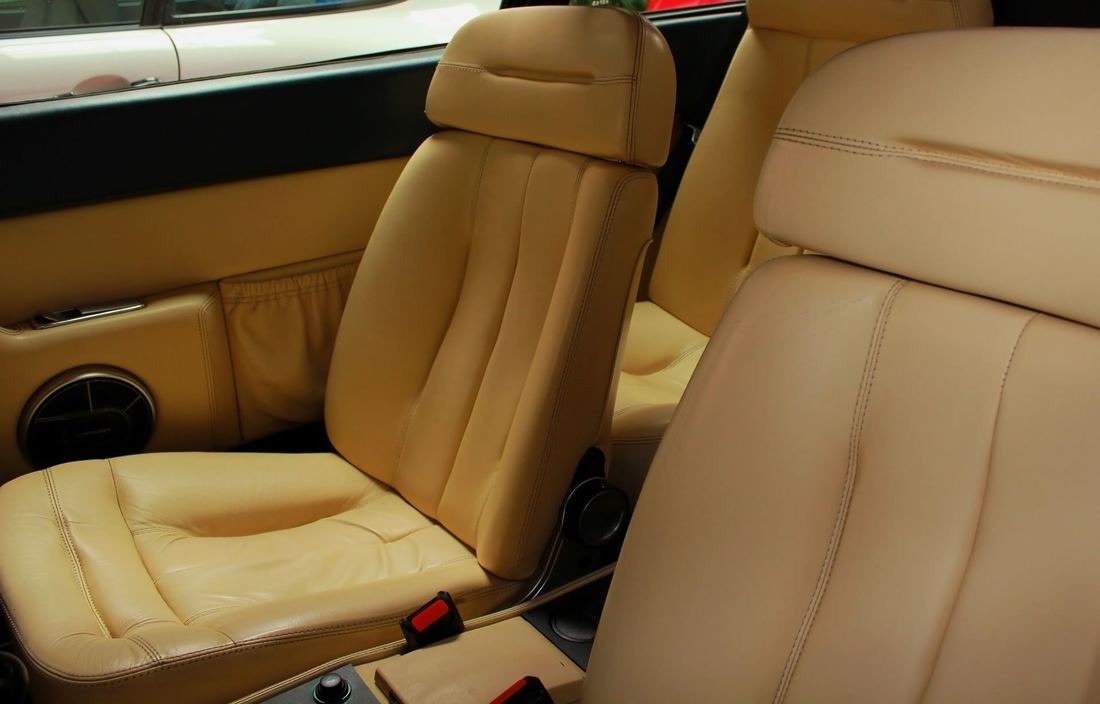
1: What Type of Leather?

You need to know if you have finished or unfinished leather. Most car manufactures disclose the type of leather used in car seats, but if you still aren’t sure, test a small dot on an inconspicuous area with water, if it leaves a mark, it is uncoated leather.

Uncoated leather: While unfinished conditions nicely, it doesn’t repel liquids. For this reason, you need to use a quality conditioner in addition to a cleaners. Look for products that are PH-balanced, and safe for uncoated leather, to ensure you restore the leather’s natural beauty.
​
Coated leather: There is no need to use a leather conditioner, because the conditioner won’t be able to be absorbed. So after you are finished cleaning the upholstery, use a high-quality protectant to prevent fading, cracking, or stains.

2: Quick maintenance
​

Dry Brush: Whenever you have a chance, run a dry clean soft-bristle brush rub in circular motion over the leather features. This will help prevent debris from building up, and collecting on your seats which could cause potential damage.
​
Vacuum:  A couple times a month or as often as you deem relevant, use a vacuum to remove all debris fragments from your interior. 

3: Cleaning

Detailing:You can leave the cleaning to an auto detailing expert once a month. They will be able to properly car for your upholstery, and warn you of any potential issues, and can give you a reliable estimate to get the problem taken care of quickly. However, you can also clean your vehicles upholstery regularly yourself.

Cleaning: Leather can be clean with a combination of warm water, and neutral soap, or invest in a cleaner specifically for your leather upholstery. Use a soft cloth to apply the clean solution, as soon as you have given the surface a good cleaning, remove the solution with a dry microfiber cloth. Don’t leave the solution on the leather, dry by itself.
​
If you would like to do regular monthly cleaning, invest in a leather specific cleaning solution. Please beware, that too much water-based solutions will weaken the fabric and color with regular use. However, specifically designed leather cleaning solution, will not damage the fabric in anyway. 

Heated Seats?
​Use the same method, but spray cleaning solution onto microfiber cloth, rather, than directly onto seat.
​
Cleaning tips:
  • Vacuum first. Make sure to use a special upholstery attachment to prevent scratching
  • Always clean a small section at a time.
  • Never let the solution dry up on the leather, always wipe solution up with a microfiber towel
  • When selecting a product solution, always start first with the less aggressive to the most aggressive solution if needed.
  • Least aggressive cleaning: Spray the section you want to clean, clean by using moderate pressure, and wipe dry with microfiber towel
 
Steaming Cleaning:
A steamer will work wonders to exfoliate your seat. Spray some solution of the area, put a microfiber towel over the steamer, applying moderate pressure, work over small areas at a time,and use another towel to frequently dry the finished seat.

4: Condition

Leather conditioner help to keep your seats from getting stiff, and helps preserve their color. Before conditioning:
​
  • Have leather be clean, and completely dry
  • Don’t be afraid of too much conditioner, excess will wipes off with a microfiber towel
  • Let conditioner sit for 20-30 minutes
  • Don’t use cheap product, unless you are certain that the product is reliable
  • Condition your seats every 3-5 weeks
2 Comments

Selecting the Best Upholstery Shop for your Classic Car Interior Restoration

11/27/2017

4 Comments

 
A GUIDE TO RESTORING YOUR AUTOMOBILE

Everything You Need to Know Before Choosing a Professional to Restore a Vintage Vehicle

Restoring your classic car is a project that takes weeks, months, and sometimes even years. Yet, a common mistake when restoring a vehicle, is putting in a top of the line motor, with a second-rate interior. 
interior restored automobile
​A completely restored vehicle is often judged on a whole, by the quality of its interior. When it comes to upholstery, you get what you pay for. You don’t want all your time and money of your restoration to reflect a second or third-rate restoration, due to the upholstery.  
​In order to ensure a quality restoration, it is crucial to find the perfect shop, to help realize, and attend to your classic car restoration. So here is a list of all aspects that you should know in order for your classic car restoration to be a huge success. 

Where to start?

Plan for Success

planning upholstery restore project
​In order to plan for success, budget early in the game. While you organize a total overhaul restoration of the body, and motor, also organize the upholstery and interior. It will give you a better idea of the total cost, as well as a steady point to steer the direction of the project.  For example, an experienced interior craftsmen can provide pointer to make sure the body fabrications or paint work match with the interior.

​It is likely that if you’re doing a total restoration that you will use multiple specialist. Plan ahead for specialist that do engine, paint, chrome, and upholstery. It might be cheaper to hire specialist individually, rather than having the shop subcontract other specialist. If you plan from the beginning, it will be easier to know all aspects, of what your project will need to be completed. 

Factor in the Cost

An interior restoration or complete auto restoration project can add up quickly. It's important to obtain a total number for the entire restore project before you get started. I've seen it time and time again: the owner depletes a large percentage of his budget on one aspect of the restore process only to have their project abandon and their automobile sitting for years on end partially restored.

Planning a project in phases, can give you an opportunity to budget for high-quality work. Set a budget early, and make sure the parameters of the project such as parts, materials, and price, are estimated for each phase. Remember a verbal agreement means nothing if there were to be any problem down the line. It is crucial, to make sure every aspect of your agreement, even subcontracts are in writing, before the transfer of any funds, or work begins on your restoration.

Visit Shops

​Unless you already have a particular professional in mind, visit and compare a few restoration shops within your area. Make sure to notice if the shops have lots of tools, or a paint room. Feel free to ask for a quote, and if the shop can accommodate your project, or will they most likely subcontract some areas? Use the information that you learn comparing the auto restoration shops to help you decided which one best fits your classic car’s needs.  
Picture
Stop by and visit our shop located in the west valley in beautiful Phoenix, Arizona!

What to Look for in an Auto Restoration Shop

  • Cleanliness
    You don’t want to trust a shop that looks like they need to get their act together with your classic restoration. Cleanliness can be a quick way to indicate shop quality, and how well they will care for you vehicle.
  • Evaluate
    With most restoration there is little formal training, or certification for upholstery, or interior work. So, you must evaluate the quality, and extent of previous completed projects. Feel free to ask them about any show car awards the shop may have won, or photos of past work. Also make sure to clarify who will be performing the work on your vehicle, and how much experience they have.
  • Protection
    You don’t want to leave your high-end car (or soon to be high-end) in a shop for a few weeks, that doesn’t have a secure building. You also want to make sure that the shop takes protective measures to ensure nothing gets scratched or damaged while they work on different phases. 
  • Quality Materials
    Yeah, you can save money by buying your own materials. However, if they don’t hold up, you are on your own. If you use coverings that is recommended by the shop, they are more than likely tried and true quality products, which they stand behind. However, if you must buy your own, know that only automotive-grade fabrics should ever go into a vehicle, and buy top brands directly from a reputable manufacturer or brand. Want to know the best brand and materials for your project? Ask your shop’s recommendations on what you should buy. 
  • The Right Job
    When it comes to classic cars, there are three levels of upholstery work that can be done. Street car, show car, hobby car. You should make sure to find a professional that is aware of the difference. If you are talking to one that is unaware of the difference, find someone who does. 


renew a classic type car
Be sure the proffessionals you're dealing with understand the difference of restoring a show car vs. hobby car.

Custom Shop vs. Restoration Shop

​Any type of professional restoration shop can do a classic car, but the look you get differs with the type of shop you use. For example a restoration shop uses a professional technicians and quality materials to get excellent results. However, if you want a special design, or upholstery done is a specific way, then you may not find that particular technique in a restoration shop. A custom shop can get you any look you want, and can add upholstery wherever you would like. 

Stay Involved

You want a shop that welcomes your drop-ins, involvement and encourages you to check on your vehicle’s continual progress. How can you be sure that the shop is maintaining your vision, or requests without being involved with the restoration process?

One way to keep up regular communication, is through regular interval billing. Regular interval billing will encourage consistent communication, as well as frequent updates on the status, and the progression of your project. If you are unable to drop in personally, use this as an opportunity, for the shop to keep you informed, with emails, and photos.  It is also nice, to ask the shop take extensive photos of anyway of each step, repair, or upgrade.

​Having step-by-step photographic evidence of your vehicle’s journey will not only be a nice memento, but may be an advantageous selling feature one day.

Fun restoration video for your viewing pleasure
1965 Mustang Fastback restored from beginning to end, 26 months of work in under 5 minutes. Cheers! 
4 Comments

Deciding between fabric or leather upholstery for your classic car

11/26/2017

2 Comments


What kind of interior best fits your classic car? Are you thinking leather or cloth?

​Should you just wait to see how much is left in your budget, before you decide what price range of upholstery will be good enough? The answer is no, a well-constructed interior is just as important to a classic car restoration, as the exterior. 
fabric or leather interior
Waiting until the end of the project to set an interior restoration budget is a mistake, one that your interior will reflect, and you will regret. To avoid this common disaster, set a budget that includes all aspects of your classic car restoration at the beginning of your project, and stick to it. 

Leather Vs. Fabric

​Before you decide on leather or cloth, take a look at this upholstery guide to help you choose the right one for your classic car restoration. 

Cloth

​Cloth is a vague term, for there are many different kinds of auto-grade cloths. Cloth is popular because it is an economical choice. The main faults of cloth is that it is very absorbent, however, it can easily be cleaned. Cloth has come a long way from its predecessors, and it a lot more resilient to fading, wear and tear, and can easily be patch repaired compared to vinyl or leather. 

Nylon

The cloth seats in your average car is usually nylon or polyester. Nylon is such a common auto-grade fabric because it is durable and inexpensive. Nylon material is porous, therefore dirt is easily trapped, especially if it is goo you cannot identify. However, hot water, soap, and some elbow grease will most likely clean, and clear up any stains or buildup.

Polyester

It's often called microsuede, in other words, it looks like, and feels similar to suede. It does look nice, but it is difficult to clean due to its texture that makes it prone to stains. Microsuede can be cleaned, but it requires a special soap, and you have to be careful not to get the fabric too wet, for even water can stain. 

Alcantara

​This fabric is similar to microsuede, and sometimes referred to as ultrasuede. The difference is that this product if flame-retardant, and more costly than microsuede.

Leather

​Leather is a high-quality fabric made from animal hide. Leather fabric has pores in it that allows it to breath, which alsoresults in absorbing liquids, and therefore harder to clean. Yet, with proper care, and moisturizing, the leather will stay plush, and luxurious.However, if you use the wrong products, or ignore caring for leather it will show by creasing, fading, or staining the surface over time.

Leather will always be the most expensive choice when it comes to upholstery. How much more depends on the quality of the leather, which can range from faux, to top-grain, or Nappa leather. 

Faux leather

​Faux, or artificial leather is made up of natural, and synthetic fibers. Faux leather will have a similar texture to leather, but will not have any breathability. Therefore faux leather will not absorb liquids, and will bevery easy to clean. Faux leather is more affordable than leather, but unlike leather it won’t continue to add value to the car.

Vinyl

​Vinyl can be an excellent choice for certain vintages, for vinyl offers an air of authenticity for vehicles of the right era. Vinyl is not porous, so it is basically waterproof, making any spill, easy to wipe off clean.However, similar to leather, vinyl is uncomfortable to touch in extreme weather conditions. Vinyl is also prone to cracking when exposed to extreme weather or direct sunlight. Those type of cracks, are very difficult to repair without having to recovering the entire seat.

Additional factors to consider

Audience

​Who is going to be riding in this classic car restoration with you?  Take a moment to think about who will be riding next to you. You don’t want to have fresh upholstery infected with the smell of spoiled milk. At this point, you might be wishing you had paid the extra for leather seats. Jokes aside, consider who will be driving along side of you, and what interior will best function for your needs.
Detailed breakdown of the proverbial leather vs. cloth debate

Climate

​When selecting upholstery consider UV rays, and your climate, for these factors affect your enjoyment and the longevity of the interior. If you live in a seasonal climate, leather can be an attractive option because there won’t be as much fear of burning your skin from the hot sun, or risk fading due to the UV rays. However if you live in a climate of extreme hot, or cold, you might consider cloth as a more attractive option.
Still need some guidance? Here are a few popular public opinions:
​
  • People who seek appearance, and style choose leather interiors

  • In climate of extreme weather people opted for cloth interiors

  • People who demand stain and smell prevention choose leather, vinyl, or faux leather interiors

  • People who wanted little to no maintenance chose nylon or cloth interiors

  • People who are concerned about resale value choose leather

  • People who are concerned about allergies chose leather, faux leather, or vinyl
    ​
  • People who value animal ethics choose vinyl, faux-leather, or a cloth option

So which one is better, leather upholstery or cloth upholstery?

It's up to you to decide what you like, what will work best for your lifestyle, and what your budget can afford. Yeah, the debate of leather vs. cloth upholstery is always going to be a heated debate. However, now that you have read all about your options, and know the pros, and cons of cloth vs leather upholstery, you can now make an educated decision. If you are still feeling indecisive, go talk to yourlocal restoration shop for advice specific to your classic car restoration project.   

2 Comments

Things to consider before restoring the interior of your classic car

11/25/2017

8 Comments


9 Tips Before You Begin an Upholstery Restoration Project

​When you think of a classic restoration, your mind may instantly go to the exterior. However, the interior is just as serious as an undertaking. Take a realistic approach to the project of restoring your classic car. In other words, take your time, shop around, do research and prepare a realistic budget. Keep in mind that you can find original factory specification, and photographs for guidance. Or have some fun hunting down the perfect parts, and accessories. If you don’t have that kind of time, or the patience, let your auto restoration specialist help you. It is important to remember that very few things go as easy as you assume it will go, to help yourself ,making plan is the best approach.

Here is a list of a few things you should consider before you start restoring the interior of your classic car.

Educate

​Learn all you can about the classic car you are about to restore. If you don’t know a personal auto enthusiast who can help, don’t be afraid to search the internet, books, magazines, or even seek a professional to help steer your project in the right direction. What are you trying to learn about? Learn about anything, and everything that could possibly help you with the restoration of the car of your dreams. For example, look at vintage ads, photobooks, and classic portfolio, anything that may help inspire the authenticity of your restauration. By learning all about your vehicle, it will help you realize what you want your restoration to be like, and the spirt you want your completed classic car to have.

​Hobby vs. Everyday

​Before you begin consider whether this auto restoration vehicle is for a hobby car, or for your main form of transportation. Restoring anything takes a lot of time and money, so you want to make sure that your goal and intentions are clear from the beginning. The upholstery for a hobby or an everyday car will be very different depending on what your needs.

​Set A Budget

​Find out how much your interior replacements will cost, and add a little wiggle room for unexpected fixes. However, once you set your budget, it should be a solid figure, commit to yourself, and don’t exceed it.

Get a Professional Detailing

​While you may think you can handle buffing, and polishing the finishes, you’d be amazed at the magic that professional detailers can reveal. You may realize that certain items, you thought would need replacing, now look good as new.

​Take Stock

​Do a thorough inspection of the vehicle, scrutinizing each section. Take note of the conditions of each interior body part, and electrical.

Get Estimates

​Your project will undoubtedly need the help of a professional at some point. A professional will save you time, and money because they will complete tasks the right way, the first time. With your own best interests at heart, make a detailed list of all the items you will want to get done by a professional, and get quotes. You can use this information so you can properly form a budget. Remember to honor yourself, and stick to your budget. 

Prepare a Work Schedule

​To avoid getting overwhelmedmake a detailed schedule of all the tasks you will complete, and when. This not only will help you keep a level head, it will also encourage you to stay on track, and have your classic restoration completed in no time.  

Organize

​Once you have a detailed idea of what elements this restoration will involve. Regardless of the extreme or slight level or tear down, document all the parts that need to be repaired or replaced. Don’t be shy, take photographs, detailed notes, and index items as you disassemble. Your detailed list will be your life line, when you are ordering parts, and plan to use the list again when you reassemblein the same order as your notes. 

Select a Pro

​Let’s say you’ve already painted the body, a unique color that you forget the name of, and the classic photo indicates intricate needle work on the upholstery. A restoration specialist will be able to help you make sure your entire restoration design is harmonious from the inside out. They also have their own tools. I’m not just talking about tools to properly restore your vehicle. But tools in locating original vehicles specifications, finding matching parts. A restoration shop also has standards to uphold, that means that your restoration must live up to their standards, making sure that your classic car is in capable professional hands.
Picture
8 Comments

DIY Guide to Repairing the Leather of your Vintage Car

11/25/2017

1 Comment


Restoring your Car's Interior Can Be a DIY Job

​Whether your leather upholstery is a fading, creasing, cracking, or showing signs of wear, the state of your leather upholstery can change the look of the interior, even if the rest of the interior is in great condition. 
Picture

So before you get ugly seat covers, or book your appointment to reupholster your seats. You can simply restore the leather of your interior. Leather, with good products, and proper care for will last you a lifetime. Restoring your leather seats is very expensive. However, if you are willing to use a couple hours of your time, you can restore leather yourself. 

Items You'll Need for Leather Repair


  • Leathercleaner
  • Leather conditioner
  • Color restore kit
  • Vacuum
  • Sponges or clean cloth​

  • Isopropyl alcohol
  • 600 grit sandpaper
  • Soft-bristle brush
  • Hairdryer
  • Small bucket
  • Screwdriver and ratchet set
What to look for in a Leather Repair kit..

Look for a leather repair kit that contains a cleaner, conditioner, and color restorer. Whichever product you decide to you, contact the distributor regarding color matching of your leather. If you are restoring the original color, contact the vehicle manufacture for a color code, or send in a swatch of your leather (under the seat you will find a spare piece to sample) to the supplier of color matching solution. Also note, that there are many leather restore products on the market offer quick fixes.

​Beware of these so called quick fixes for they contain only petroleum distillates which result only in weakening the leather fibers, and stitching. For example, the silicone will harden into the leather limiting its flexibility, and the waxes will make your leather shine, only to trap dirt, and contaminate the hide. Therefore, it is crucial to understand the importance, and significance of buying quality products that actually rejuvenate your leather. Your product should contain a leather specific collagen complex, which will actually penetrate the hide, and nourish, restore, and keep the leather supple, and flexible.

I’d recommend using Glipstone Liquid Scuff Master, Lexol Leather Care, and Leather World which are all highly recommended leather repair brands. Additionally, Guardsman makes a pretty good leather care product and they have a full care guide your can download here.

Repairing

​The first step in vehicle upholstery repair is evaluating the extent of the damage. If there are holes or tears in the upholstery, you might not be able to repair it. You can look into a leather patch repair kit, but if you want a flawless repair, see a professional. Also, if the leather damage extends to the seat belt, or other safety equipment, you will want to seek a professional to tackle the repairs. Do not try to tackle any repairs that involve the safety equipment of the vehicle. 

Step 1: Clean your interior

The best way to deep clean your interior of your vehicle is to remove everything from the vehicle, including the seats, if accessible. You will want to thoroughly clean every nook and cranky of the interior. That includes thoroughly vacuuming the seats, and floorboards, and examining the surfaces for stains or blemishes. Use a leather cleaner product, and a damp cloth or sponge and rub in circular motion to remove initial dirt. For the grimy spots, use the leather cleaner and the soft-bristle brush. Once satisfied, remove the any cleaner residue and gently wipe the area with a mild solvent like isopropyl alcohol. Once the leather is again completely dry, examine the surfaces for worn or faded spots.
​
​If your leather is cracked:

​Make sure the leather has been cleaned, like the above instructions. When the leather is dry, gently sand the cracked areas with a 600 grit sandpaper, until smooth. Careful not to remove too much old leather with the sandpaper, that you create a suede.

Next open a leather repair kit, one that has a leather sealant product, or leather crack filler. Use the product to smooth out the cracks according the packaging. Once the leather is dry, you can continue on to sand, or layer if necessary. Once you have maintained a flawless finish, move on to the next step.

Step 2: Dye or Restore Faded Surfaces

If your leather seats are faded, you can also restore or change the color. Before you begin, test a small spot to make sure your color matches your swatch, and are happy with the color.Keep in mind, it is normal for the color to be slightly more vibrant until it dries. When you are ready to begin, consult your packaging instructions, and start with the seams, pipping, and edges, and allow them to dry. Then proceed to the broader areas. Apply several thin coats, making sure to brush in all directions. Careful, not to stop in the center or middle of a panel. In order to get a professional looking job, work slow, and consistently. Allow each piece to dry thoroughly before you continue to apply another coat. If you are changing the color, expect to have to do additional coats. Depending on the instruction of the product that you used, 24- 48 hours later when the leather is dry completely, use a leather conditioner to bring a rich shine to the leather. 
​
Restore your Steering wheel:

​
If you also want to dye or restore the leather of your steering wheel, the steps will be the same. However, usually steering wheels have a protective clear coat protection on them. It is important to replace this finish after, with an application of leather clear coat.

Step 3: Apply Leather Conditioner

​Once you are satisfied with your leather, and it is fully dry, your leather ready to be conditioned. Most leather-care products come with a toner to alter the color, so test a small area for a color match, and alter the solution as needed. Apply to product per the manufacturer’s instructions, usually with a soft-bristle brush or sponge. If your leather has creases or cracks, dilute the product by 30% with water, and rub it into leather. Letting it dry for a minute or so, and rubbing the solution off with a damp cloth. The product will come off the leather but should remain in the creases, and cracks.

Now that your leather upholstery is in great condition again, how do you keep it that way?

Condition seats regularly

​Maintain a clean vehicle interior, by vacuuming debris regularly, cleaning all upholstery with gentle cleaner. Be sure to use the right products, for the right upholstery. After cleaning, finish the job by applying a leather conditioner to your leather upholstery. The conditioner will help the leather upholstery with their pliability, and will prevent cracks, and signs of wear.

Avoid the sun

​Leather upholstery will fade, or crack with continuous extended periods of direct sunlight.  Use a sunshield in the windshield if you have to. If your side windows aren’t tinted, you can use window panels to minimize the sun’s intensity, and to shield potential damage.

Avoid bulky and sharp objects

​Always put bulky objects in your trunk if possible. When putting objects on the seat, make sure to lay down something over the leather for protection, like a blanket or pad. Sharp or bulky objects is the easiest way to rip or tear your upholstery. So don’t keep tools, pet carries, or sharp objects directly on the seat.
1 Comment

    Bob's Custom Paint
    Car Stories

    We all have a story and so do our cars. Here’s a look into the hearts of some of our featured cars.

    Call Us at
    (623) 937-5724

    Archives

    November 2017
    January 2015
    November 2014
    January 2014
    November 2013
    July 2013
    June 2013
    May 2013
    March 2013
    February 2013
    January 2013

    Categories

    All
    1940 Ford
    Classic Car
    Custom Creation
    Nomad Group
    Open Doors
    Restoration
    Street Rods
    Upholstery

    RSS Feed

Bob's Custom Paint, Inc.

Picture

BCP Home
The BCP Shop
BCP Services
BCP Car Stories
BCP Gallery of Cars
Contact BCP


Bob's Custom Paint, Inc. - 7809 N. 68th Ave Glendale, Arizona 85303 - (623) 937-5724
BCP Shop Hours: Monday to Friday: 7:30AM - 4:00PM - Saturday and Sunday: Closed